 GlusterFS部署
| 系统 | IP | 角色 | 磁盘 |
|---|---|---|---|
| Anolis OS 8.6 | 172.16.5.81 | node1(Server) | /dev/sdb |
| Anolis OS 8.6 | 172.16.5.82 | node2(Server) | /dev/sdb |
| Anolis OS 8.6 | 172.16.5.83 | node3(Server) | /dev/sdb |
| Anolis OS 8.6 | 172.16.5.46 | Client | /opt/gfsmount |
# GlusterFS 几种volume 模式说明:
默认模式,既DHT, 也叫 分布卷: 将文件已hash算法随机分布到 一台服务器节点中存储
gluster volume create test-volume server1:/exp1 server2:/exp21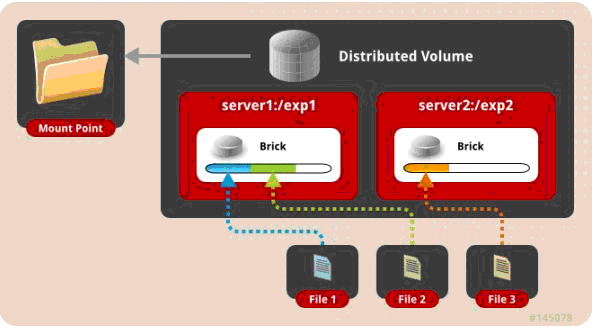
复制模式,既AFR, 创建volume 时带 replica x 数量: 将文件复制到 replica x 个节点中
gluster volume create test-volume replica 2 transport tcp server1:/exp1 server2:/exp21
条带模式,既Striped, 创建volume 时带 stripe x 数量: 将文件切割成数据块,分别存储到 stripe x 个节点中 ( 类似raid 0 )
gluster volume create test-volume stripe 2 transport tcp server1:/exp1 server2:/exp21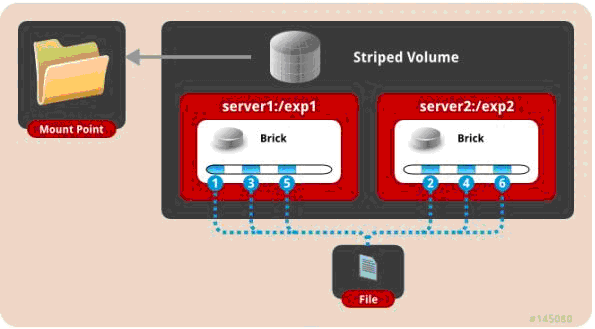
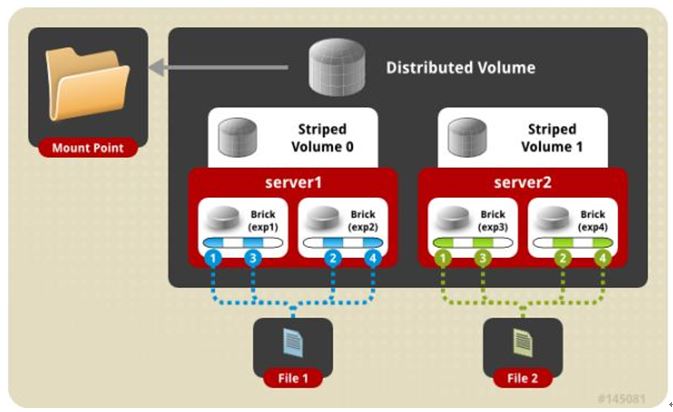
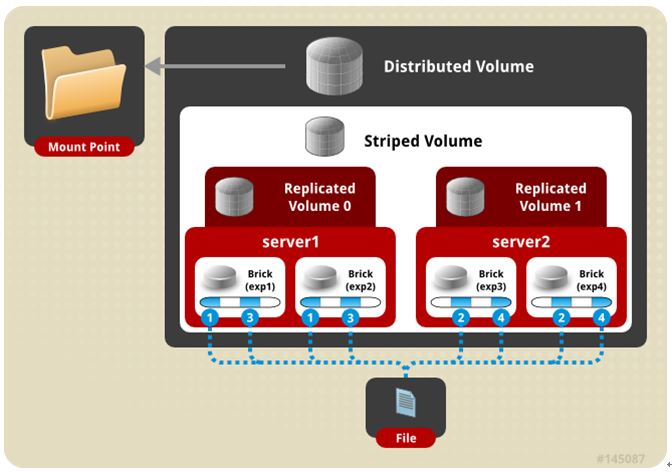
分布式条带模式(组合型),最少需要4台服务器才能创建。 创建volume 时 stripe 2 server = 4 个节点: 是DHT 与 Striped 的组合型
gluster volume create test-volume stripe 2 transport tcp server1:/exp1 server2:/exp2 server3:/exp3 server4:/exp4
1
分布式复制模式(组合型), 最少需要4台服务器才能创建。 创建volume 时 replica 2 server = 4 个节点:是DHT 与 AFR 的组合型
gluster volume create test-volume replica 2 transport tcp server1:/exp1 server2:/exp2 server3:/exp3 server4:/exp41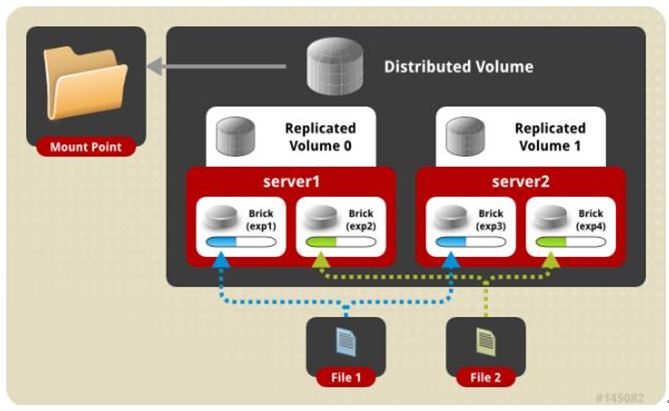
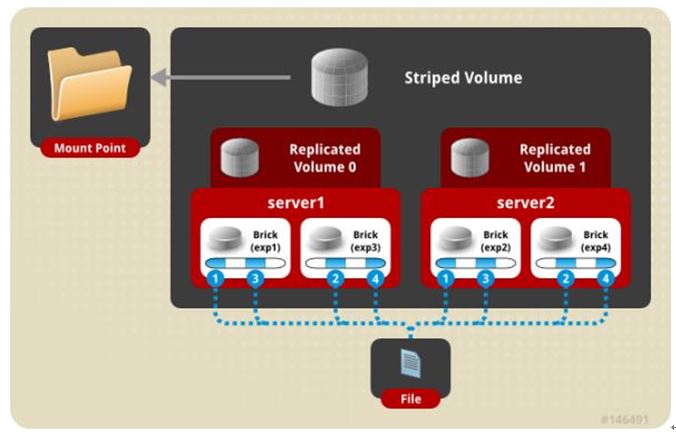
条带复制卷模式(组合型), 最少需要4台服务器才能创建。 创建volume 时 stripe 2 replica 2 server = 4 个节点: 是 Striped 与 AFR 的组合型
gluster volume create test-volume stripe 2 replica 2 transport tcp server1:/exp1 server2:/exp2 server3:/exp3 server4:/exp4
1
- 三种模式混合, 至少需要8台 服务器才能创建。 stripe 2 replica 2 , 每4个节点 组成一个组
gluster volume create test-volume stripe 2 replica 2 transport tcp server1:/exp1 server2:/exp2 server3:/exp3 server4:/exp4 server5:/exp5 server6:/exp6 server7:/exp7 server8:/exp8
1
# 0. 节点之间的时间要一致
# 1. Server和client端 关闭防火墙、selinux
sed -i "s/SELINUX=enforcing/SELINUX=disabled/" /etc/selinux/config
setenforce 0
systemctl disable --now  firewalld
1
2
3
2
3
# 2. Server端 添加hosts信息
cat << EOF | tee -a /etc/hosts
172.16.5.81 node1
172.16.5.82 node2
172.16.5.83 node3
EOF
1
2
3
4
5
2
3
4
5
# 3. Server端 部署服务
# 3.1 离线安装
curl -O https://github.com/xiaobujiang/service/releases/download/Glusterfs-v10.5/server.tar
tar xf server.tar && cd server
yum install -y *.rpm

# 查看版本
glusterfs -V
1
2
3
4
5
6
2
3
4
5
6
# 3.2 互联网环境部署
# 配置yum源
cat << EOF | sudo tee /etc/yum.repos.d/CentOS-Linux-Gluster-8.repo
[centos-gluster10]
name=CentOS-8 - Gluster 10
baseurl=https://mirrors.huaweicloud.com/centos/8-stream/storage/x86_64/gluster-10/
gpgcheck=0
enabled=1
gpgkey=file:///etc/pki/rpm-gpg/RPM-GPG-KEY-CentOS-SIG-Storage
EOF

# yum 安装
yum clean all && yum install -y https://mirrors.aliyun.com/anolis/8.10/AppStream/x86_64/debug/Packages/python3-pyxattr-debuginfo-0.5.3-18.el8.x86_64.rpm && yum install -y glusterfs \
  glusterfs-server \
  glusterfs-fuse \
  glusterfs-rdma \
  glusterfs-geo-replication \
  glusterfs-devel

# 查看版本
glusterfs -V
1
2
3
4
5
6
7
8
9
10
11
12
13
14
15
16
17
18
19
20
2
3
4
5
6
7
8
9
10
11
12
13
14
15
16
17
18
19
20
# 4. Server端 格式磁盘
# lsblk
NAME        MAJ:MIN RM   SIZE RO TYPE MOUNTPOINT
sda           8:0    0   200G  0 disk
├─sda1        8:1    0   600M  0 part /boot/efi
├─sda2        8:2    0     1G  0 part /boot
└─sda3        8:3    0 198.4G  0 part
  ├─ao-root 252:0    0    70G  0 lvm  /
  ├─ao-swap 252:1    0   7.9G  0 lvm  [SWAP]
  └─ao-home 252:2    0 120.5G  0 lvm  /home
sdb           8:16   0   100G  0 disk  # 可以看到sdb并没有使用 那我们接下来通过mkfs格式化/dev/sdb
sr0          11:0    1  1024M  0 rom

# mkfs.xfs  /dev/sdb
meta-data=/dev/sdb               isize=512    agcount=4, agsize=6553600 blks
         =                       sectsz=512   attr=2, projid32bit=1
         =                       crc=1        finobt=1, sparse=1, rmapbt=0
         =                       reflink=1    bigtime=0 inobtcount=0
data     =                       bsize=4096   blocks=26214400, imaxpct=25
         =                       sunit=0      swidth=0 blks
naming   =version 2              bsize=4096   ascii-ci=0, ftype=1
log      =internal log           bsize=4096   blocks=12800, version=2
         =                       sectsz=512   sunit=0 blks, lazy-count=1
realtime =none                   extsz=4096   blocks=0, rtextents=0
1
2
3
4
5
6
7
8
9
10
11
12
13
14
15
16
17
18
19
20
21
22
23
2
3
4
5
6
7
8
9
10
11
12
13
14
15
16
17
18
19
20
21
22
23
# 5. Server端 磁盘挂载
mount /dev/sdb /data/gfs

echo "/dev/sdb /data/gfs xfs defaults 1 2" >> /etc/fstab

df -hT|grep gfs
/dev/sdb            xfs       100G  747M  100G    1% /data/gfs
1
2
3
4
5
6
2
3
4
5
6
# 6. Server端 启动服务
# 创建 glusterd 目录
mkdir /data/gfs/glusterd

# 修改 glusterd 目录
sed -i 's/\/var\/lib\/glusterd/\/data\/gfs\/glusterd/g' /etc/glusterfs/glusterd.vol

# 启动服务
systemctl enable --now glusterd
systemctl status glusterd
1
2
3
4
5
6
7
8
9
2
3
4
5
6
7
8
9
# 7. Server端 建立GlusterFS分布式存储集群(这里选择在node1上操作。其实在任意一个节点上操作都可以)
# 7.1 建立集群
# node2 加入
[root@node1 ~]# gluster peer probe node2
peer probe: success

# node3 加入
[root@node1 ~]# gluster peer probe node3
peer probe: success

# 查看
[root@node1 ~]# gluster peer status
Number of Peers: 2

Hostname: node2
Uuid: f36406ca-7560-474e-b3a1-9b666e51f07e
State: Peer in Cluster (Connected)

Hostname: node3
Uuid: 28b92f80-54d6-4719-b82c-e342cc912249
State: Peer in Cluster (Connected)
1
2
3
4
5
6
7
8
9
10
11
12
13
14
15
16
17
18
19
2
3
4
5
6
7
8
9
10
11
12
13
14
15
16
17
18
19
# 7.2 创建名为xiaobujiang的复制卷
# 创建数据目录
[root@node1 ~]# mkdir /data/gfs/xiaobujiang
[root@node2 ~]# mkdir /data/gfs/xiaobujiang
[root@node3 ~]# mkdir /data/gfs/xiaobujiang

# 创建3副本的xiaobujiang数据卷  replica3表明存储3个备份,即有多少个节点就存储多少个备份,后面指定服务器的存储目录
[root@node1 gfs]# gluster volume create xiaobujiang replica 3 node1:/data/gfs/xiaobujiang node2:/data/gfs/xiaobujiang node3:/data/gfs/xiaobujiang  force
volume create: xiaobujiang: success: please start the volume to access data

# 查看volume 信息
[root@node1 server]# gluster volume info
Volume Name: xiaobujiang
Type: Replicate
Volume ID: 07a424ef-e532-40b5-997a-a50ad2668d80
Status: Created
Snapshot Count: 0
Number of Bricks: 1 x 3 = 3
Transport-type: tcp
Bricks:
Brick1: node1:/data/gfs/xiaobujiang
Brick2: node2:/data/gfs/xiaobujiang
Brick3: node3:/data/gfs/xiaobujiang
Options Reconfigured:
cluster.granular-entry-heal: on
storage.fips-mode-rchecksum: on
transport.address-family: inet
nfs.disable: on
performance.client-io-threads: off

# 启动 xiaobujiang volume
[root@node1 gfs]# gluster volume start xiaobujiang
volume start: xiaobujiang: success

# 停止 xiaobujiang volume
[root@node1 gfs]# gluster volume stop xiaobujiang
Stopping volume will make its data inaccessible. Do you want to continue? (y/n) y
volume stop: xiaobujiang: success

#删除 xiaobujiang volume
[root@node1 gfs]# gluster volume delete  xiaobujiang
1
2
3
4
5
6
7
8
9
10
11
12
13
14
15
16
17
18
19
20
21
22
23
24
25
26
27
28
29
30
31
32
33
34
35
36
37
38
39
40
2
3
4
5
6
7
8
9
10
11
12
13
14
15
16
17
18
19
20
21
22
23
24
25
26
27
28
29
30
31
32
33
34
35
36
37
38
39
40
# 7.3 查看 volume 信息
[root@node1 ~]# gluster volume info

Volume Name: xiaobujiang
Type: Replicate
Volume ID: f1945b0b-67d6-4202-9198-639244ab0a6a
Status: Created
Number of Bricks: 1 x 2 = 2
Transport-type: tcp
Bricks:
Brick1: 192.168.10.239:/opt/gluster/data
Brick2: 192.168.10.212:/opt/gluster/data
1
2
3
4
5
6
7
8
9
10
11
2
3
4
5
6
7
8
9
10
11
# 7.4 查看volume状态
[root@node1 gfs]# gluster volume status xiaobujiang
Volume demo is not started

Status of volume: xiaobujiang
Gluster process                             TCP Port  RDMA Port  Online  Pid
------------------------------------------------------------------------------
Brick node1:/data/gfs/xiaobujiang              55971     0          Y       2208
Brick node2:/data/gfs/xiaobujiang              59055     0          Y       2062
Brick node3:/data/gfs/xiaobujiang              50941     0          Y       2054
Self-heal Daemon on localhost               N/A       N/A        Y       2242
Self-heal Daemon on 172.16.5.83             N/A       N/A        Y       2088
Self-heal Daemon on 172.16.5.82             N/A       N/A        Y       2096

Task Status of Volume xiaobujiang
------------------------------------------------------------------------------
There are no active volume tasks
1
2
3
4
5
6
7
8
9
10
11
12
13
14
15
16
2
3
4
5
6
7
8
9
10
11
12
13
14
15
16
# 8. Client端 挂载使用
# 8.1 客户端安装
curl -O https://github.com/xiaobujiang/service/releases/download/Glusterfs-v10.5/client.tar
tar xf client.tar && cd  client && yum install -y *.rpm

# 互联网环境,配置yum源
cat << EOF | sudo tee /etc/yum.repos.d/CentOS-Linux-Gluster-8.repo
[centos-gluster10]
name=CentOS-8 - Gluster 10
baseurl=https://mirrors.huaweicloud.com/centos/8-stream/storage/x86_64/gluster-10/
gpgcheck=0
enabled=1
gpgkey=file:///etc/pki/rpm-gpg/RPM-GPG-KEY-CentOS-SIG-Storage
EOF
yum install -y https://mirrors.aliyun.com/anolis/8.10/AppStream/x86_64/debug/Packages/python3-pyxattr-debuginfo-0.5.3-18.el8.x86_64.rpm glusterfs glusterfs-fuse
1
2
3
4
5
6
7
8
9
10
11
12
13
2
3
4
5
6
7
8
9
10
11
12
13
# 8.3 建立挂载目录
mkdir -p /opt/gfsmount
1
# 8.4 挂载glusterfs
# 添加hosts信息
[root@Client ~]# cat << EOF | tee -a /etc/hosts
172.16.5.81 node1
172.16.5.82 node2
172.16.5.83 node3
EOF

# 挂载glusterfs
[root@Client ~]# mount -t glusterfs node1:xiaobujiang /opt/gfsmount/
[root@Client ~]# echo " node1:xiaobujiang /opt/gfsmount glusterfs defaults,_netdev 0 0"  >> /etc/fstab

# 创建文件测试验证多副本是否生效
[root@Client ~]# touch /opt/gfsmount/xiaobujiang.txt

# server节点验证
[root@node1 xiaobujiang ~]# ls -l /data/gfs/xiaobujiang/
总用量 0
-rw-r--r-- 2 root root 0 8月  13 22:19 1.txt

[root@node2 xiaobujiang]#  ls -l /data/gfs/xiaobujiang/
总用量 0
-rw-r--r-- 2 root root 0 8月  13 22:19 1.txt

[root@node3 gfsmount]# ls -l /data/gfs/xiaobujiang/
总用量 0
-rw-r--r-- 2 root root 0 8月  13 22:19 1.txt
1
2
3
4
5
6
7
8
9
10
11
12
13
14
15
16
17
18
19
20
21
22
23
24
25
26
27
2
3
4
5
6
7
8
9
10
11
12
13
14
15
16
17
18
19
20
21
22
23
24
25
26
27
# 8.5 client端挂载的node1节点宕机了,client是否可以继续写入?
xiaobujiang卷是3副本模式(如之前创建命令中的 replica 3),即使 node1 挂了,客户端仍然可以写入,原因是:
- 复制卷会将数据同步存储到多个节点(3 副本即同时存 3 份)
- Gluster 客户端挂载时会通过初始节点(node1)获取整个集群信息,建立与所有节点的连接
- 当 node1 故障,客户端会自动切换到其他正常节点(node2、node3)继续读写操作
- 数据会写入剩余的正常节点,待 node1 恢复后,集群会自动同步缺失的数据
1
2
3
4
5
2
3
4
5
# 9. Server端 glusterfs性能调优
# 9.1 首先开启指定volume的配额
gluster volume quota xiaobujiang enable
1
# 9.2 限制 xiaobujiang总目录最大使用 5GB 空间(5GB并非绝对,需要根据实际硬盘大小配置)
gluster volume quota xiaobujiang limit-usage / 5GB
1
# 9.3 设置 cache 大小(128MB并非绝对,需要根据实际硬盘大小配置)
gluster volume set xiaobujiang performance.cache-size 128MB
1
# 9.4 开启异步,后台操作
gluster volume set xiaobujiang performance.flush-behind on
1
# 9.5设置 io 线程 32
gluster volume set xiaobujiang performance.io-thread-count 32
1
# 9.6 设置 回写 (写数据时间,先写入缓存内,再写入硬盘)
gluster volume set xiaobujiang performance.write-behind on
1
# 9.7 查看
gluster volume info xiaobujiang
1
上次更新: 2026/05/31, 03:30:34